Blue Winged Beach Photoshoot – Dragon Nest

I’ve been a long time fan of Dragon Nest for awhile~ Especially for the custom outfits that change SO rapidly. The designs are always so interesting and I have so many favorites! One of my favorites is a design made by ZiyoLing! First seeing this design I really had the urge to make it! I started sometime last year and the skill level for me to do it justice just wasn’t there at the time. Finally… months later I am able to re-do parts and have a shoot again!

Dragon Nest Archer Blue 1

Back shot! Photo by Hermsi

I actually did this shoot in about 10 minutes since the sun was setting rapidly. But it did make for a pretty sky :D I also was in the water for about 2 hours? So I went back, showered, threw on some makeup again (although I forgot to bring mascara) and went back out! I am planning on another photoshoot with the boots and wig/contacts etc etc~ Probably in a forest scenery?

Full Front. Photo by Hermsi

Full Front. Photo by Hermsi

I also had to modify some parts since they weren’t re-done… So please excuse the lack of accuracy XD I do like the picture above since it shows off the whole bow for once! This is the bow I did the cardboard tutorial with~ Honestly it has held up until I put some clay on the handle to make it round. That created the handle to crack. Maybe I’ll re-do this bow in wood? At least it’ll make a cool wall decoration xD

Dragon Nest Archer Blue 3

Photo by Hermsi

I’m trying to work on more modeling. I know how to do cutsy and fun poses/expressions but I was always afraid to do more serious/stoic expressions. I’m working on it! For the longest time people have told me I can’t do it, then I realize I let them get in my head. Why can’t I do it? I can totally do it~ So here I am, trying at least xD
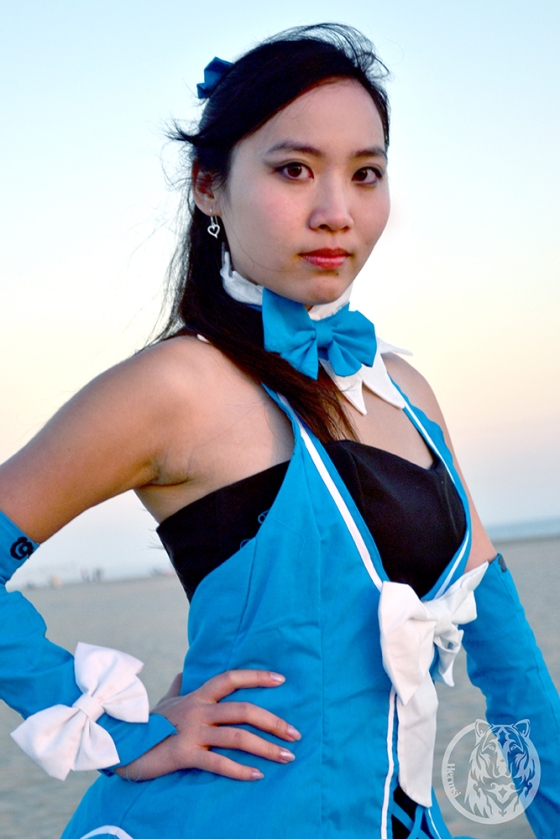
Dragon Nest Archer Blue 4

Photo by Hermsi

Overall I’m happy with a 10 minute photo shoot! I learned a lot in a short amount of time~ Some tips for other cosplayers…
-Don’t be afraid of stares, take it as a sign to show them who is boss and fearless enough to be out in public in a weird cosplay.
-Even if a cosplay isn’t complete, that shouldn’t stop you from rocking it.
-Always have fun and find ways to improve!

I’ll DEFINITELY be having another full-on photo shoot with this cosplay. It’s my #1 toughest cosplay to finish apparently xD So I’m determined~

All photos by Hermsi
Cosplay and modeling by Yours truely~

–Kimikotan

Fantasy Archer Bow Tutorial

Hello All~~

So when I made my archer bow for my Dragon Nest Archer cosplay I decided to take pictures at every step! I’m hoping it’ll help out anyone that needs something similar to it since I do get asked what it was made out of.

The bulk of the short bow is made out of cardboard… you know those packaging boxes you can buy at the hardware store.

Materials you will need are:

1. Cardboard pieces cut out in even squares (so if its small you can cut 4 x 4 and if your prop is bigger than 8 x 8 like mine)
2. Glue meant for paper/cardboard!
3. Exact-o Knife or a box cutting knife for the cardboard

1239855_669175836433603_275004922_n


From there you’d want to already have your rough draft of the prop! So draw that baby out on some banner paper or butcher paper (whatever you might call it) and with that you can layer the cardboard! So it’s layers in a way where the creases are NOT in the same place so it’s more sturdy. Think of… bricks. They aren’t stacked right on top of each other but instead in the middle of two! For this bow I used 3 layers of cardboard.. it’s pretty sturdy with that amount. I’d use 3 as a bare minimum if you want it to have some strength to live on, more is always welcomed if you need something thicker though~

So here is just my reference picture and you can start to see some linear process!
Here just glue the squares on top of each other with the cardboard glue.. then trace your pattern down!

1382884_677489922268861_1490015951_n

So from here… you may want the extra support in the middle so I put in dowels! I just cut the dowels into pieces that I needed and traced the shape to where I wanted it on the bow. Cut out the slots and used ALOT of hot glue to glue them in! No worries if it’s a little messy on top, this will be paper mache’d later so it won’t even be noticeable~ I even used a thinner square wood piece for the more thinner ends of the bow… it puts my mind at ease that it won’t bend if I accidentally bump into someone.

1395916_684402441577609_1577026903_n

Now to use your arm muscles!! Cut your design out! Hopefully yours doesn’t have these curves like mine… it takes a lot of patience! AFter that I cut the same design out of cardstock! The thick hard paper on top will automatically make the paper mache process go a lot smoother~ This step is of course optional but just from my experience… it looks nicer :D

1385196_687981494553037_34693306_n

After a few layers of paper mache… paint it over with your favorite gesso! Mine just happens to be black this time around xD Then I sanded it and painted it again with another layer of gesso. You can keep repeating this process until you get the desired smoothed surface~

1504022_714742615210258_190939879_n

So from here I would just paint on the design and add the big wings you see on the reference picture. Sadly I don’t have an updated picture of it.. but I will update this when I do :D

I hope that helps someone on maybe not just this bow but some other prop they are trying to make! It’s possibly the cheapest prop I have made but just because the materials are cheap doesn’t mean the outcome looks like it :D Just remember to put time but patience into your projects and they will sure succeed~

–Kimikotan

Keep updated with me on Facebook and twitter!

DN Archer Outfit Progress! –Blue top

It’s been awhile hasn’t it? I think it’s about time I went back to showing progress pictures and how I do some of my outfits :D Back in January I half debuted an Archer cosplay from the game Dragon Nest! Still alterations to be made but that doesn’t mean I can’t share the progress I did~ So first off here’s a reference picture!

Now the black dress underneath was quite simple. Just a normal sweetheart fitted top with some boning on the sides so it’ll keep shape and stay up. Then I took about… 3 circle skirts, sewed them together to make one huge line of circle skirt and attached that on! To create a more distinguished “poof” I decided to add horsehair on the edge and that made walking around SUPER fun! (like every step the skirt would jump up and little in response xD) So this skirt I didn’t need to have a petticoat underneath but I think I would want one if I decide to have it bouncier xP

Archer PRogress 1Back to making my own patterns! Always a lot of trial and error with this process and I’m sad that I didn’t have more time with it. But I think it turned out well… I just tried to picture the top as a cross between a vest and a halter top.

Archer PRogress 2This was the fun part =3 I got satin ribbon but it was really shiny… I didn’t like that. So I attached it… was not happy still… so I painted it the same color as my bow! It turned out pretty well as the paint hardened (regular acrylic paint) so not only did I have a nice matte color but it also hardened into place so it wouldn’t move. Worked out better than expected~ You can see the fit wasn’t right so there is an unironed seam in the middle of the front sides. (please make sure to iron seams!) Afterwards I just got bias tape from the store and sewed that on! (I’ve been so lazy to make my own bias tape…)

Do you see a slight flip in front on the right picture? That’s with interfacing!  Unfortunately that was with medium interfacing and that part needed a heavier kind or to double up on medium. Make sure to use the right kind and amount of interfacing with projects!

Archer PRogress3


paint paint paint! In hindsight I would’ve used regular white paint but I used fabric paint. … doesn’t have much of a difference to it in this case xD I always love free handing the designs but I think at one point is was off… in which case I would recommend putting some markings to make sure its even xD

More updates on the bow I made to match it! And the interesting way of doing a lace-up boot from fabric!

–Kimikotan